mad_blog
Mouse Control with Computer Vision and Neural Networks
Computer Vision had gained my attention for quite a while. I had ideas of getting away from my desk and interacting with my computer in more physically engaging ways and computer Vision seemed like the right domain to make this happen with minimal hardware involved. Since I was already craving to hop in on one of the most exciting areas of computer applications, I decided to make something useful out of it.
The goal here is to control the mouse with the help of hand gestures.
By Control, I meant: panning directions, clicks, double clicks, mouse wheels and drag and drops.
- The system had to see my hand
- Decipher commands/actions/gestures - this involved cleaning the noise and errors if any
- Transfer this control to the mouse
- If any learning was involved, I wanted to train a custom model using reinforcement if possible
OpenCV
Computer Vision is incomplete without OpenCV.
OpenCV is the world’s biggest computer vision library. It is open source, contains over 2500 algorithms, and is operated by the non-profit Open Source Vision Foundation since June 2000.
OpenCV contains a variety of algorithms and toolsets that are commonly used to process visual data.
With OpenCV, making python code take a sneak peek out the camera is as simple as
import cv2

camera = cv2.VideoCapture(0) # or cv2.VideoCapture(0, cv2.CAP_DSHOW) for windows
if camera.isOpened():

    # read information from the camera
    success, frame = camera.read()

camera.release()
The frame is a numpy array that represents the image recieved in a grid-like format.
Although image values look like 2D information that has width and height alone, if we look at it from the persective of data, this 2D-frame contains 3 values (Red, Green and Blue) for every pixel in the grid which essentially makes it a 3-dimensional data object.
OpenCV uses BGR format instead of RGB. This subtle information is useful when it comes to rendering and data transfer to other systems which might rely on an RGB format.
To continuously keep reading from the camera stream, we could setup a loop and display the frames to a window using opencv.
import numpy as np
import cv2

cam = cv2.VideoCapture(0)
while cap.isOpened(): # loop
    success, frame = cam.read() # read the frame

    # display the frame on a window named Frame.
    cv2.imshow('Frame', frame)

    # a way to break out of the loop
    if cv2.waitKey(1) & 0xFF == ord('q') or \
        cv2.getWindowProperty(WINDOW_NAME, cv2.WND_PROP_VISIBLE) < 1:
        break

# clear resources properly
cap.release()
cv2.destroyAllWindows()
We are now able to stream data off the camera.
Next we should look into processing this data to perform intelligent operations on it.
Neural Network Models
Deep Learning is a field of technology which involved the training of layers of Artificial Neural Networks to predict values efficiently. The field grew exponentially towards the 2020s and the possibilities were unimaginable. The reason for this sudden growth owed itself to multiple research, the results of which were open sourced to the public making it easily accessible for widespread use.
The training of such neural network models required huge amounts of data.
Although the data, research and architecture was openly known to all, the training of huge models was still a challenge on small-scale machines.
This is one reason why most Machine-Learning or Artificial Intelligence projects rely on pre-trained models.
A neural network seemed like the best fit for detecting and tracking my hand. I decided to look for models that would help me detect hand gestures from my cam feed and found MediaPipe by Google to be a really nice match for my requirements.
The MediaPipe library helps to estimate the positions of skeletal joints of the hand and returned the coordinates (referred to as landmarks).
import mediapipe as mp

# setup hands and utilities
mp_drawing = mp.solutions.drawing_utils
mp_drawing_styles = mp.solutions.drawing_styles

# setup pretrained AI model.
mp_hands = mp.solutions.hands
handyman = mp_hands.Hands(
    min_detection_confidence=.8,
    min_tracking_confidence=.5)

# process the image frame
result = handyman.process(rgb_frame)
if result.multi_hand_landmarks: # check if the hand landmarks exist
    for hand_lms in result.multi_hand_landmarks: # take each hand

        # draw circles and lines into the frame
        mp_drawing.draw_landmarks(
            rgb_frame, hand_lms, mp_hands.HAND_CONNECTIONS,
            mp_drawing_styles.get_default_hand_landmarks_style(),
            mp_drawing_styles.get_default_hand_connections_style())
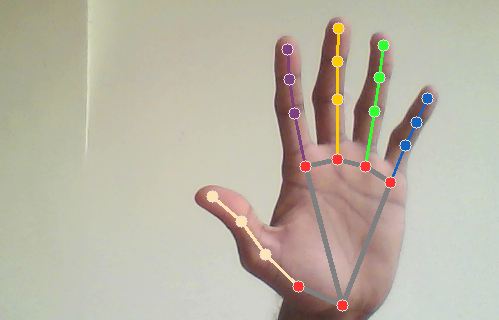
Plugging the mediapipe process into the loop, we are now able to observe the camera feed, detect the pixel positions of the joints of the hand. Now we should our turn our focus into converting these points into control signals for the operations we are interested in.
Control with PyAutoGui
PyAutoGui is a library that helps to control mouse and keyboard actions from python code. We will use this library to control the mouse based on the logic we will build. PyAutoGui has the following functions that we are interested in:
movemoves the mouse by a number of pixels.moveTomoves the mouse to a specific cordinate on the screen.scrollscrolls a certain distance.mouseDownpresses the mouse button, useful for long clicks together withmouseUplifts the button after clicking.doubleClickperforms a double click.
MediaPipe already detects the positions of the the skeleton for me so we could fetch the position of the joints from it.
To move the mouse according to the middle fingertip let’s do some math.
Consider two frames in the video stream A and B. Let’s say the position of my fingertip in frame A is (x1, y1) and that in frame B is (x2, y2).
The amount of pixels my fingertip moved (delta_x, delta_y) can be calculated as (x2-x1, y2-y1).
Calling pyautogui to move the mouse by this delta would move the mouse in that direction.
For ease of use, I have written a python function that takes the previous landmarks and the current landmarks to move the mouse. We can call this function with the landmarks from the processed frame from the loop.
import mediapipe as mp
mp_hands = mp.solutions.hands
lms = mp.solutions.hands.HandLandmark

def mouse_control(prev_lms, curr_lms):
    # fetch the coordinate of the hand, assuming we have atlease one detected hand
    curr_index = curr_lms.multi_hand_landmarks[0].landmark[lms.MIDDLE_FINGER_TIP]
    last_index = prev_lms.multi_hand_landmarks[0].landmark[lms.MIDDLE_FINGER_TIP]

    # calculate the delta
    delta_x = curr_index.x - last_index.x
    delta_y = curr_index.y - last_index.y

    # move mouse
    pyautogui.move(delta_x, delta_y)
I have to bring to notice these bugs that I encountered, their reasons and resolutions.
-
The landmarks returned a normalized value.
This meant that insead of returning absolute pixel values in the range of (0-1080] or an appropriate screen resolution, we usually received values in the range (0.0-1.0]. To get over this, I decided to pass in the current frame of the video to the function and use it’s width and height to scale my deltas to a better value. This was not the best solution, but it was a step forward.... h, w, _ = frame.shape delta_x = w * (curr_index.x - last_index.x) delta_y = h * (curr_index.y - last_index.y) -
Flipped video on front facing web-cams.
The video had to be flipped to make sure the hands movements were intuitive. Flipping the frame horizontally immediately after the read fixed this.success, frame = cam.read() frame = cv2.flip(frame, 1) -
Multiple hands caused the mouse to jump around.
If a second hand pops into the screen, the control from the first hand gets transferred to the new hand. To add to the issue, when the positions of the two hands are far apart, this looks like an immediate jump from one location to another causing the mouse to fly around. This is not ideal.This happened because I was using the index of the first hand in the list to control the mouse. MediaPipe seemed to be placing new hands at the start of the array. This caused the tracked index finger to jump from one finger in a frame to the new finger.
# bug curr_index = curr_lms.multi_hand_landmarks[0].landmark[lms.MIDDLE_FINGER_TIP] last_index = prev_lms.multi_hand_landmarks[0].landmark[lms.MIDDLE_FINGER_TIP] # fix curr_index = curr_lms.multi_hand_landmarks[-1].landmark[lms.MIDDLE_FINGER_TIP] last_index = prev_lms.multi_hand_landmarks[-1].landmark[lms.MIDDLE_FINGER_TIP]
After extracting functionality like checking for an escape sequence and rendering the frame to the window, the updated loop now looks like this.
# cached frame
cached_hands = None
cam = cv2.VideoCapture(0)
while cam.isOpened():
# observe
success, frame = cam.read()
frame = cv2.flip(frame, 1) # flip horizontally
# process hands
rgb_frame = cv2.cvtColor(frame, cv2.COLOR_BGR2RGB) # since MediaPipe expects an rgb frame
hands_found = handyman.process(rgb_frame)
if hands_found.multi_hand_landmarks:
render_hands_to_frame(frame, hands_found)
mouse_control(frame, cached_hands, hands_found)
cached_hands = hands_found # update cache after use
else:
# clear cache if no hands are found in the frame
cached_hands = None
cv2.imshow(WINDOW_NAME, frame)
if check_escape():
break
With this we are successfully able to move the mouse using our index finger.
We will now make the script click the mouse if the tip of the thumb and ring finger are found close enough.
What does close enough mean? The distance between the thumb-tip and ring fingertip, compared with that of the last joint on the thumb. This gives a relative distance check that is unbiased of the pixel distance involved. One down side to this approach is when the positions superimpose, this might trigger a false detection but this is rare nevertheless.
More control
I added global boolean variables IS_MOUSE_CLICKED to track the state and modified the mouse_control method to handle clicks.
    ...
    t1 = curr_lms.multi_hand_landmarks[-1].landmark[lms.THUMB_TIP]
    t2 = curr_lms.multi_hand_landmarks[-1].landmark[lms.THUMB_IP]
    r1 = curr_lms.multi_hand_landmarks[-1].landmark[lms.RING_FINGER_TIP]
    t1_coord = (int(w * t1.x), int(h * t1.y))
    r1_coord = (int(w * r1.x), int(h * r1.y))
    t1_t2 = ((t1.x - t2.x) ** 2 + (t1.y - t2.y) ** 2) ** .5 # thumbtip to thumbnail
    t1_r1 = ((t1.x - r1.x) ** 2 + (t1.y - r1.y) ** 2) ** .5 # thumbtip to ringtip

    # bold assumtion: distances less than the thumbnail size is an intended click
    if t1_r1 < t1_t2:
        if not IS_MOUSE_CLICKED:
            IS_MOUSE_CLICKED = True
            pyautogui.mouseDown()
    elif IS_MOUSE_CLICKED:
        IS_MOUSE_CLICKED = False
        pyautogui.mouseUp()
It is annoying when the mouse tracks our hand around even when we don’t want it to. There had to be a locking mechanism which would activate the tracking. To achieve this we can simply duplicate the mouse-click logic to implement a lock. I changed code around so it will track the distance between my index-fingertip and middle-finger tip. When the index and middle finger were close together, the mouse would follow my hand. Otherwise it stays put.
Adding similar distance checks to trigger buttons and scrolls and functionality finally helps to achieve more control.
Checkout the full code on my github.
Improvements
There is a lot of room for improvement. The only question would be if this is the right approach to push performance forward or should we experiment with another approach.
- Pretrained models are used in my example to detect hand positions. The control code still remains hard-coded. We could push it further by implementing our own training strategies to teach the script to recognize gestures. It would be organic.
- Under low-light conditions, the detection becomes unstable and the values start to jump around. Averaging the locations from previous cached frames is one way to smooth and reduce the glitch.
- Positions of joints when superimposed might trigger a false detection.
- Adding more distance checks will make the system fragile depending on model performance and lighting. The best way to overcome this is to use improved models and crisp hardware. Data augmentation is something that could also be explored.
. . .
madhaven
20250813